WaterRight is a practical way to schedule irrigation using two simple measurements: how far water penetrates into the soil (irrigation depth) and how much evaporation has occurred since the last irrigation. With these, you can keep plants productive, avoid wasting water below the root zone, and adjust between shallow and deeper watering as conditions change. WaterRight uses depth sensors, an accumulated evaporation meter, and adaptive software to learn your plant’s real water use over time.
Why scheduling matters
To schedule irrigation properly you need two things: how much water your plants are using, and how much water is currently stored in the soil profile. When you know these, you can do more than “keep things alive”. You can maintain steady production by keeping soil moisture in the useful range, rather than bouncing between too wet and too dry. You can also control water distribution in shallow and deep layers, vary soil water content to prepare for hot or wet weather, and even manage fruit quality and fruit set by applying controlled stress (often referred to as regulated deficit irrigation, RDI).
The core idea is simple: the best irrigators do not guess. They measure. WaterRight is designed to turn a few easy measurements into a repeatable routine that helps you avoid the two classic losses: water lost to evaporation because the wetting is too shallow, and water wasted beyond the roots because the wetting is too deep. It also helps avoid the common cycle where soil is allowed to get too dry and then is over-watered to “catch up”, which often pushes water below the root zone and can leach nutrients.
What WaterRight is
WaterRight is a system that combines three components: (1) irrigation depth sensors to tell you how far water has penetrated after an irrigation, (2) an accumulated evaporation meter to show how much atmospheric demand has occurred since the last irrigation, and (3) adaptive software that learns the plant’s water use and helps you plan how much to apply next time. The goal is not to create more complexity. The goal is to replace guesswork with a small number of measurements that are meaningful to growers.
How it works: the five-step WaterRight method
1) Decide your target irrigation depth
Start by deciding the target irrigation depth. This is the depth you want the irrigation to wet, because it matches where the roots are actively working. If watering is too shallow, much of the irrigation is later lost by surface evaporation. If watering is too deep, water is wasted because it passes beyond the roots. A good target depth thoroughly wets the root zone without pushing water below it.
WaterRight also supports varying depth through the season or through a cycle. In many soils, you will find the top layer is quite dry while deeper soil still holds moisture. Most nutrients are in the upper soil, so it can still be worth applying a shallow irrigation even when there is water deeper down. After several shallow irrigations, the deeper soil will slowly dry out. This may take four to five irrigations. At that point, apply a larger irrigation that is sufficient to wet the full root depth so the whole profile is thoroughly wetted again.
This alternating pattern is practical: shallow irrigations keep the nutrient-rich surface zone productive, while occasional deeper irrigations rebuild reserves and keep deep roots functional. It is also a simple way to avoid the “all-or-nothing” approach where growers either constantly top up the surface (often wasting water) or wait too long and then over-correct with a heavy irrigation.
2) Measure irrigation depth (before and after irrigating)
Your irrigation depth meter tells you how far the water has penetrated into the ground after irrigation. The method described for WaterRight uses stainless steel probes pushed into the ground, with readings taken before and after irrigation. The key is that you are not trying to measure “average soil moisture everywhere”. You are checking whether the wetting front has reached the depth you intended.
Early on, before the software has learned your plant’s water use, you can use this as a direct control method: apply water until the required irrigation depth has been reached. This is a very grower-friendly way to work, because the target is tangible and easy to verify. Over time, as you build up observations, the system becomes predictive: you specify the depth you want, and WaterRight helps estimate how much water is likely needed to reach it under current conditions.
This approach directly addresses one of the most common inefficiencies in irrigation: applying water without knowing where it went. Measuring irrigation depth makes the outcome visible, and once you can see the outcome, you can improve it.
3) Measure evaporation before you need to irrigate again
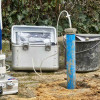
Once you know how deep you wet the soil, the next question is: how long can you wait before watering again? WaterRight uses accumulated evaporation as a practical indicator of “water demand since the last irrigation”. The described method uses an evaporation meter (the “Magic Mushroom” style gauge). You fill it when you irrigate, and then track evaporation. A rubber band marker can be used to indicate the accumulated evaporation before you may need to irrigate again.
When WaterRight has learned your plant’s water usage, it will tell you how much evaporation to allow between irrigations. Until then, you can use a first estimate. The document provides a simple rule of thumb: divide the root depth by 20 to estimate the accumulated evaporation you can allow between irrigations. For example, if the root depth is 200 mm, a first estimate of accumulated evaporation would be 10 mm.
This is not about being perfect on day one. It is about starting with a reasonable estimate and then improving it using measurements. Evaporation is a strong “driver” of plant water demand, and tracking it gives you a consistent reference point that is often easier than relying on appearance alone.
4) Use WaterRight to calculate plant water usage
The system then brings the measurements together. You enter the evaporation, water applied, and irrigation depth data (both before and after irrigation) into WaterRight, and use the crop factor calculation to determine plant water use. Because plant water use changes as plants grow and as conditions change, you repeat this regularly rather than assuming a fixed value.
The water use table is designed to show you exactly how much water you need to add at any time to refill the profile. In other words, it converts observations into a simple action: “apply this much to get back to full” (where “full” means the profile is wetted to the target depth and at field capacity in the wetted volume).
WaterRight also supports a practical strategy for deeper-rooted plants. It can be better to use a partial irrigation approach to keep the top zone moist while allowing the deeper root zone (which often uses less water day-to-day) to dry out slowly. When the depth sensor shows the deep soil is drying out, you then switch to a full irrigation to wet out the deeper zone again. Done correctly, this does not stress the plant because moisture is always available in the upper zone. It is a controlled way of managing where the plant is drawing from, rather than forcing the plant into stress by accident.
Reading the WaterRight water balance display
The WaterRight table and graph concept described in the document uses clear visual cues. Red indicates the maximum deficit has been reached, which means you have gone too far and risked a loss of production. Yellow indicates a good time to irrigate, well before the plant goes into stress. Blue indicates that water has passed beyond the root zone. This “too dry then over-irrigate” pattern is described as a common fault in irrigation management, and the display helps you see it quickly.
The system can also support deliberate controlled stress for fruit quality or fruit set. The key warning is practical: you can allow the deep, tougher roots to dry out, but you should ensure the delicate surface feeder roots do not become too dry, because that can damage root structure and reduce performance even after you resume watering. The document also notes that a sensor can be used to measure the start of stress in the plant (for example, by inserting electrodes into the plant), which can be used when you want precision rather than relying on visual signs.
5) Determine the maximum allowable water deficit
The last step is understanding how far you can let the soil water “deficit” develop before the plant begins to suffer. The document suggests you can estimate the maximum allowable deficit by observing the plant for signs of water stress and checking the deficit value in WaterRight. However, it cautions that growth is reduced well before the typical visual signs (such as leaf droop) appear. In practice, if you are aiming for maximum production, you should keep the deficit well above the maximum deficit. If you routinely hit the maximum, you are likely losing production even if the plants “recover”.
If you do want to deliberately stress the plant, the document’s approach is to use a sensor to indicate onset of stress before visual signs appear. This is important because “visible stress” is often late stress, and late stress tends to be more damaging and harder to manage precisely.
The minimum deficit allowable depends on several real-world factors: soil type, the wetted volume (how much soil your irrigation method actually wets), and the plant’s ability to extract water from the soil. The document notes that this can be measured by reading the deficit from WaterRight when the plant just starts to go into stress. It also provides a practical guideline: typically, irrigation should be applied when the deficit has dropped to about half the maximum, unless your goal is controlled stress for fruit set or quality. Even then, keep the upper soil containing fine feeder roots moist.
Why different plants behave differently under stress
A useful reminder from the document is that different plants have very different capacities for extracting water from soil. Plants like tomatoes, with limited extraction capacity, can be very sensitive to water stress. Leaf droop may be an obvious sign, yet a soil sample can still feel moist because the plant cannot access that moisture effectively under current conditions. By contrast, a grapevine may show no stress while the soil is quite dry and crumbly. This difference matters because it affects how you set your “maximum deficit” thresholds and how conservative your scheduling should be.
Putting it all together: a simple operating rhythm
In practice, WaterRight becomes a rhythm rather than a complex project. You choose a target depth. You measure depth before and after irrigating to confirm the wetting front. You track accumulated evaporation to understand demand between irrigations. You record the water applied. Then the adaptive calculation helps refine your understanding of plant water use so you can refill the profile accurately without guessing.
The value of this approach is that it deals with the real world as it is: soil does not wet perfectly evenly, weather changes quickly, and plants change their demand as they grow. A method based on irrigation depth and evaporation is straightforward for growers to understand, easy to explain to others on a farm, and practical to apply across different irrigation systems and crop types.
Download “WaterRight Irrigation Scheduling” (full PDF)